Nut Roast Galette A Showstopper for Your Meat

Introduction

Move over traditional vegan nut roasts; there’s a new star in town, and it’s the Nut Roast Galette. Perfect for your meat-alternative table centerpiece, this savory galette boasts a flavorful blend of chestnuts, mixed nuts, and aromatic herbs, all encased in a golden, flaky shortcrust pastry. In this comprehensive guide, we’ll walk you through the ingredients and step-by-step directions to create this delightful and visually appealing dish.

Ingredients

For the Filling:

  • 2 tbsp. olive oil
  • 1 onion, chopped
  • 1 stick celery, chopped
  • 100 g chestnut mushrooms, chopped
  • 2 cloves garlic, chopped
  • 1/2 tsp. smoked paprika
  • 3 sprigs thyme
  • 1 tbsp. chopped fresh sage, plus whole leaves to garnish
  • 180 g pack cooked chestnuts, roughly chopped
  • 200 g unsalted mixed nuts (cashews, Brazil nuts, walnuts)
  • 30 g pumpkin seeds
  • 30 g dried cranberries

For the Pastry:

  • 500 g block Jus Rol shortcrust pastry
  • Flour, for dusting
  • 2 tbsp. soy milk or other milk alternative
  • 1 tsp. poppy seeds

Accompaniments:

  • Vegetable gravy, to serve

Directions

Step 1: Preparing the Oven and Pastry

Pre-heat the oven to 200ºC(180ºC Fan) and line a large square baking tray with non-stick baking paper. Allow the pastry to come to room temperature.

Step 2: Sautéing the Vegetables

In a large frying pan, heat olive oil over medium heat. Sauté onion, celery, mushrooms, garlic, thyme sprigs, and chopped sage until softened. Add smoked paprika, salt, and black pepper. Cook for 1 minute and then remove from heat, discarding the thyme sprigs.

Step 3: Processing the Mixture

Transfer the vegetable mixture and chestnuts to a food processor. Blitz until finely chopped.

Step 4: Mixing the Nuts and Seeds

In a large bowl, combine half of the nuts, pumpkin seeds, and dried cranberries. Blitz the remaining nuts in the food processor until roughly chopped. Stir the chopped nuts into the vegetable mixture.

Step 5: Rolling Out the Pastry

Dust the work surface with flour and roll out the pastry to a 32cm circle. Lift the pastry onto the lined tray using a rolling pin.

Step 6: Spreading the Filling

Spread the filling evenly across the center of the pastry, leaving a 5cm ring around the outside edge without filling.

Step 7: Decorating the Galette

Arrange the remaining whole nuts and pumpkin seeds on top of the filling.

Step 8: Folding and Brushing

Brush the outside ring of pastry with milk and fold over the filling, pleating the pastry as needed. Brush the top edges with more milk and sprinkle poppy seeds.

Step 9: Baking

Bake for 50mins-1hr or until the pastry is dark golden brown. Cover the galette with foil after 30mins if the nuts are getting too dark. Five minutes before the end, remove the foil and scatter extra sage leaves to crisp.

Step 10: Cooling and Serving

Allow the galette to cool for at least 5mins before slicing. Serve with vegetable gravy and cranberry sauce on the side.

Conclusion

With its impressive presentation and delightful combination of flavors and textures, the Nut Roast Galette is set to become the new centerpiece of your meat-alternative table. Whether you’re a seasoned chef or a novice in the kitchen, follow these detailed steps to create a showstopping dish that will leave your guests impressed and satisfied. Elevate your plant-based culinary repertoire with this Nut Roast Galette, a perfect blend of creativity and deliciousness.

Crafting the Perfect Homemade Lemonade

Introduction

Tart, zesty, and sweet, homemade lemonade is a quintessential summer beverage that tantalizes your taste buds. Whether you prefer it still or sparkling, sweet or bitter, this guide has everything you need to create the perfect glass of lemony goodness. From crafting the ideal sugar syrup to choosing the right ice and garnishes, let’s embark on a journey to elevate your homemade lemonade game.

The Foundation: Creating the Sugar Syrup

  1. Sugar Syrup Magic

The base of traditional lemonade lies in a carefully crafted sugar syrup. Achieving the right balance of sweetness and lemony flavor requires dissolving sugar and lemon peel in just-boiled water. Learn the art of making this essential syrup that can also be a versatile addition to various cocktails.

  1. Juicing Mastery

To extract the maximum juice from your lemons, bring them to room temperature and give them a good roll on the countertop. Discover the technique that loosens the fruit and releases the juice, ensuring you get the most out of every lemon. Pro tip: a quick stint in the microwave can further soften lemons for an extra juice boost.

Customizing Your Lemonade

  1. Water Wonders

Still or sparkling? The choice is yours! Uncover the secrets of creating a fizzy lemonade with sparkling water or savor the simplicity of an old-school treat with still water. Adjust the lemon juice levels to cater to your taste preferences, whether you’re craving tartness or a milder tang for the little ones.

  1. Ice, Ice, Baby

Explore the world of ice and its impact on your lemonade experience. Smashed ice for a slushy barbecue delight, jangly ice cubes or balls for a leisurely swish, or big blocks that melt slowly – each type plays a role in enhancing your lemonade pleasure without diluting its flavor.

  1. Garnishing Elegance

Elevate your basic lemonade with enticing garnishes. Mint sprigs, thin lemon slices, or lime wedges add layers of flavor. Uncover the trick to achieving a deliciously sour rim by dunking glasses in lemon juice followed by sugar. For a sour candy mocktail, sprinkle citric acid in the sugar before coating the rim.

Exploring Bitter Variations

  1. Lickety-Split Lemonade

For those seeking a bitter twist, embark on the journey of a lickety-split lemonade. This old-school version involves slicing lemons, removing seeds and pith, and blending them with water, sugar, and ice. Strain the mixture for a cloudier appearance and a more bitter profile. Adjust the bitterness by experimenting with peel removal and sieving techniques.

  1. Whipped Lemonade Delight

Take your lemonade experience to the next level with a decadent treat – whipped lemonade. Combine condensed milk, squirty cream, lemon juice, and ice in a blender for a luscious, creamy delight that indulges your senses.

Recipe for Perfection

Ingredients:

  • 5-6 unwaxed lemons
  • 200 g granulated sugar
  • 250 ml water
  • 1 l water (or sparkling water, soda, or your preferred choice)

Directions:

  1. Remove lemon peel, avoiding the white pith. Juice the lemons, setting the juice aside.
  2. In a saucepan, combine sugar, lemon peel, and water. Boil, stirring continuously until sugar dissolves.
  3. Remove from heat, add lemon juice, and let it cool. Strain into a bottle or jug, and chill.
  4. Serve as desired, with water, sparkling water, and your favorite garnishes.

Now armed with this comprehensive guide, unleash your creativity and embark on a journey to master the art of homemade lemonade. Cheers to refreshing moments and the satisfaction of crafting the perfect glass!

The Art of Making A Crispy Delight Aloo Paratha

Introduction

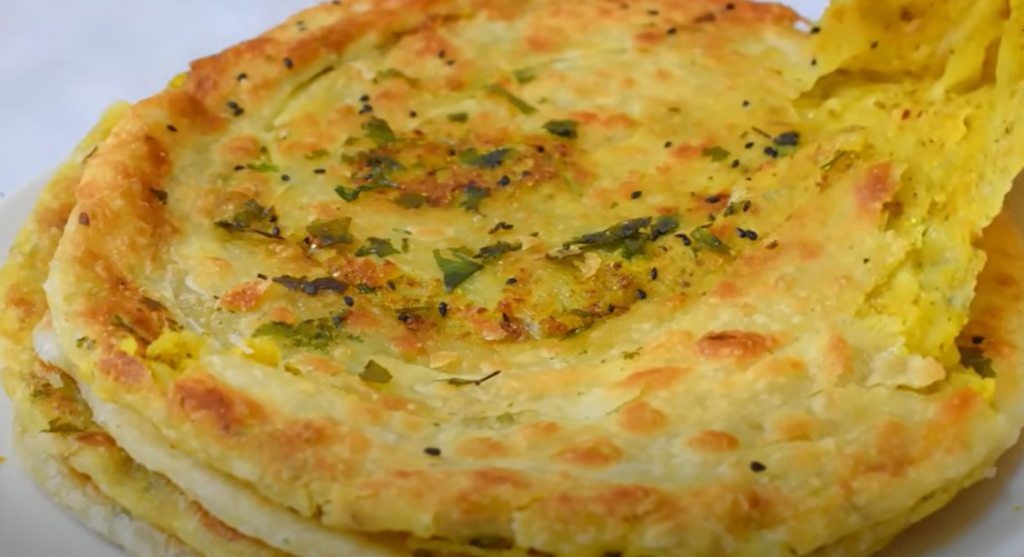
Aloo Paratha, a beloved Indian dish, is a delightful combination of crispy, buttery flatbread and spiced mashed potatoes. Prepared on a flat pan known as a tava, this culinary masterpiece can be enjoyed as a breakfast treat or a satisfying meal. In this detailed guide, we’ll explore the art of making Aloo Paratha from scratch, step by step, ensuring that every bite is a perfect blend of flavors and textures.

Ingredients for Aloo Paratha

To embark on this culinary journey, gather the following ingredients:

  • 370 g atta flour
  • 300 ml warm water
  • 1 tsp. salt
  • 600 g cooked potatoes, lightly mashed
  • 1 medium onion, finely chopped
  • 1 green finger chilli, finely chopped
  • 1/2 tsp. each turmeric, garlic powder, and chilli flakes
  • 3/4 tsp. black pepper
  • 1 tsp. salt
  • 1 tbsp. chopped coriander
  • 8 tbsp. butter or oil

Making the Paratha Dough

Step 1: Mixing the Dough

  1. Place atta flour, salt, and water in a mixer, combining them on a low setting until a soft, non-sticky dough forms.
  2. Set the mixer to medium and knead for five minutes.
  3. Allow the dough to rest for at least 20 minutes, making it easier to roll out.

Preparing the Potato Filling

Step 2: Creating the Filling

  1. In a bowl, combine mashed potatoes, finely chopped onion, green chilli, turmeric, garlic powder, chilli flakes, black pepper, salt, and chopped coriander.
  2. Mix the ingredients thoroughly using your hands and divide the filling into 8 balls.

Rolling and Stuffing the Paratha

Step 3: Shaping the Dough

  1. Divide the rested dough into 8 balls and cover them with a wet tea towel to prevent drying.

Step 4: Rolling and Stuffing

  1. Lightly dust the counter with flour.
  2. Roll out one ball of dough into a 15cm disc.
  3. Spread a teaspoon of butter or oil over the disc and place a potato filling ball on top.
  4. Gather the edges of the dough to fully cover the filling, twisting to seal it closed.

Step 5: Rolling Out

  1. Place the stuffed dough sealed side down on the counter.
  2. Pat it out gently with fingers, preventing filling escape.
  3. Roll out the dough to about 25cm using a rolling pin, ensuring specks of filling are visible.

Cooking the Aloo Paratha

Step 6: Pan Preparation

  1. Heat a pan to medium (a crepe pan can be a great alternative to a tava).
  2. Gently dust excess flour off the paratha and place it on the pan for 20-30 seconds.

Step 7: Initial Cooking

  1. Flip the paratha and spread a teaspoon of butter or oil.
  2. After 30 seconds, flip it again, buttering the other side.

Step 8: Final Cooking

  1. Allow the paratha to cook until small brown spots appear.
  2. Flip it for the final time, press gently with a spatula, and wait for brown spots to crisp up.

Step 9: Serving

Serve the Aloo Paratha immediately while it’s crisp and buttery, accompanied by refreshing raita and spicy chilli pickle.

Conclusion

Making Aloo Paratha is not just a culinary process; it’s an art form that combines skill and creativity. With these detailed steps, you can create a crispy, flavorful delight that will transport your taste buds to the streets of India. Enjoy the magic of Aloo Paratha and savor each moment as you master the art of its creation.


The Art of Crafting Perfect Pierogi Rusike

A Journey into Polish Comfort Cuisine

Introduction: Pierogi, the epitome of Polish comfort food, are delectable filled dumplings that invite you to embark on a culinary adventure. Much like their counterparts, ravioli, mantoo, or gyoza, these versatile morsels can be filled with an array of ingredients, ranging from savory minced meat to sweet jams. In this recipe, we delve into the world of pierogi ruskie, filled with a delightful combination of caramelized onions, potatoes, and a blend of cottage and cheddar cheese.


  1. The Heart of Pierogi: The Dough Creating the perfect pierogi begins with mastering the art of crafting the dough. This section guides you through the process, emphasizing the importance of allowing the dough to rest for enhanced texture and ease of handling.

Ingredients:

  • 230 g flour
  • 1 egg
  • 1/2 tbsp. oil
  • 1/2 tsp. salt
  • 75 ml warm water
  • 1 1/2 tbsp. salted butter

Directions: Step 1: Begin with the dough, combining the ingredients in a stand mixer. Refrigerate the dough, allowing it to rest for optimal results.

Step 2: A crucial step in pierogi preparation involves caramelizing onions, infusing a rich flavor that elevates the dish. Learn the art of achieving the perfect caramelization.

  1. Pierogi Ruskie Filling: A Symphony of Flavors The soul of any pierogi lies within its filling. Uncover the secrets to creating a tantalizing mixture of potatoes, cheeses, and caramelized onions, perfectly balanced for a taste of authentic pierogi ruskie.

Ingredients:

  • 90 g onion, diced
  • 100 g cooked potatoes, roughly mashed
  • 90 g cottage cheese
  • 15 g cheddar cheese, grated
  • 1/4 tsp. pepper
  • 1 tsp. oil
  • 1 tbsp. chopped chives

Directions: Step 3: Combine potatoes, cheeses, cooled onions, and pepper for a harmonious filling. Dive into the sensory experience of mixing these ingredients by hand.

III. Crafting the Perfect Pierogi: From Dough to Dumpling The crafting of pierogi involves a meticulous process, from rolling out the dough to sealing the edges with finesse. Learn how to assemble these delectable dumplings for a culinary masterpiece.

Directions: Step 4: Assembling the pierogi requires skill and precision. Uncover tips on rolling out the dough to the ideal thickness and creating perfectly sealed dumplings using a simple cookie cutter or glass.

Step 5: Boiling pierogi is the traditional method, and this section takes you through the process, ensuring your dumplings are cooked to perfection. Learn the art of identifying when pierogi are ready and the key to preventing sticking.

Step 6: For those who prefer a crispier texture, discover the alternative method of pan-frying pierogi. Explore the nuances of achieving a golden brown exterior while maintaining a tender interior.

  1. Serving Up Culinary Delight: A Feast for the Senses The final act of the pierogi journey involves serving up a visual and flavorful feast. From a shower of caramelized onions to a sprinkle of fresh chives, learn how to present your pierogi ruskie with flair.

Directions: Step 7: Discover the art of presentation as you pour remaining butter over the pierogi and garnish with chives and reserved caramelized onions. Dive into the sensory experience of savoring pierogi while they are hot.

Conclusion: Embark on a culinary journey through the creation of pierogi ruskie, where each step unveils the secrets to crafting the perfect Polish comfort food. Whether you savor the traditional boiled version or indulge in the crispiness of pan-fried pierogi, the art of making these dumplings is a testament to the rich tapestry of global cuisine. So, roll up your sleeves and immerse yourself in the delightful world of pierogi crafting.


The Culinary Symphony of Pani Puri

Exploring the Art of Crafting a South Asian Delicacy

Introduction

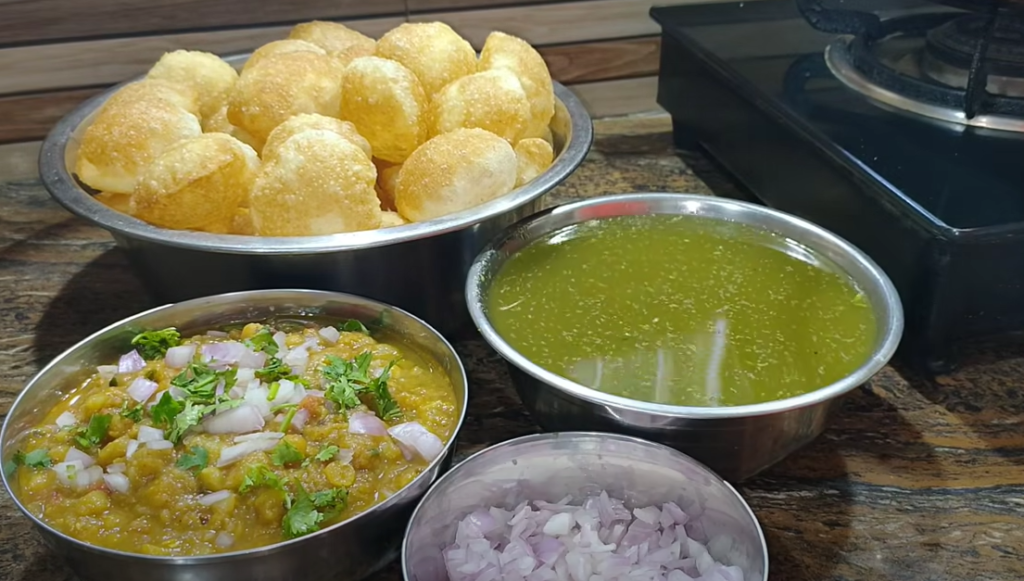
Pani puri, a beloved South Asian street food, goes by various names such as gol guppay or golgappa, captivating the taste buds with its crunchy semolina spheres filled with a delightful vegetarian stuffing and dipped in a tantalizing blend of tart, spicy, and sweet tamarind water. This culinary masterpiece, often enjoyed in servings of four or five, holds a special place in the hearts of street food enthusiasts, offering a sensory explosion that is both crispy and yielding, juicy and flavorful simultaneously.

The Unique Delight of Pani Puri

Delving into the essence of pani puri, the experience is nothing short of a flavor bomb. The semolina dough spheres, deep-fried to perfection, are meant to be devoured whole, creating a symphony of textures and tastes as they crunch open in the mouth. The secret to maintaining their crispy exterior lies in the last-minute addition of tamarind water, ensuring that the spheres don’t succumb to sogginess. This feature not only enhances the enjoyment on the bustling streets but also makes pani puri an excellent choice for serving at more refined gatherings, adding a playful touch to dinner parties.

Entertaining Preparation and Ready-to-Fry Puri

Embarking on the journey of crafting pani puri is an adventure in itself. While ready-to-fry puris are conveniently available at South Asian supermarkets or online, the process of making them from scratch is both entertaining and rewarding. The flat discs, when introduced to hot oil, exhibit a mesmerizing transformation. They rise to the surface, balloon up, and flip over autonomously, evolving into golden, hollow globes ready to embrace a filling of chickpeas and potatoes.

Title 1: Crafting the Tamarind Elixir

Ingredients for Tamarind Water

  • 20 g wet tamarind (or tamarind paste)
  • 200 ml hot water
  • 1/2 tsp. black salt
  • 1/2 tsp. red chili powder
  • 1/2 tsp. black pepper
  • 1/2 tsp. chaat masala
  • 1/2 tsp. cumin powder
  • 1/4 tsp. salt
  • 1 1/2 tsp. sugar

Step 1: The Tamarind Infusion

Commence the pani puri creation by crafting the essential tamarind water. Mix wet tamarind and hot water in a bowl, mashing them together. Allow the mixture to soak for an hour, letting the flavors meld and infuse into a rich, tangy elixir.

Title 2: Symphony of Fillings

Ingredients for Filling

  • 90 g canned chickpeas
  • 225 g ready-made mashed potato
  • 1/2 red onion, finely chopped
  • 1 green bullet or jalapeño chili, finely sliced
  • 1/4 tsp. black salt
  • 1/4 tsp. black pepper
  • 1/4 tsp. chaat masala
  • Chaat masala for sprinkling

Step 2: The Filling Ensemble

While the tamarind mixture soaks, orchestrate the filling by combining canned chickpeas, mashed potatoes, finely chopped red onions, sliced chili, black salt, black pepper, and chaat masala. This tantalizing mixture awaits its role in enhancing the pani puri experience.

Title 3: The Magical Transformation in Hot Oil

Step 3: The Puri Ballet

Transitioning to the next act, fill a deep pan with oil for deep frying, heating it over medium heat until the oil reaches the desired temperature. Introduce four to five puris into the pan, witnessing their captivating rise to the surface and ballooning up, resembling miniature golden orbs just smaller than a golf ball. After a mere 40 seconds, execute a swift flip and removal, ensuring they retain their perfect golden hue, placing them on a cooling rack to drain.

Title 4: Completing the Tamarind Symphony

Step 4: The Tamarind Water Finale

The tamarind water takes center stage as the soaked mixture undergoes a sieve performance into a jug. Squeeze out any remaining seeds or tamarind chunks, extracting every last drop of juice. Discard the used tamarind and add sugar, salt, and spices to the sieved tamarind water, stirring until dissolved. The result is a harmonious blend of flavors ready to elevate the pani puri experience.

Title 5: The Culinary Presentation

Step 5: The Grand Finale

The final act involves the careful presentation of pani puri. Create a small hole in the top of each puri, gently widening it without causing any cracks. Fill each puri with the prepared mixture, sprinkle with a pinch of chaat masala, and just before serving, pour in the flavorful tamarind water. The culmination is an explosion of flavors in every wholehearted bite.

Conclusion

In conclusion, the journey through the world of pani puri is a culinary adventure, offering a rich tapestry of flavors, textures, and entertaining preparation techniques. Whether enjoyed on the vibrant streets of South Asia or meticulously crafted at home, pani puri transcends its street food origins, transforming into a symphony of taste that captivates and delights with each mouthful. So, immerse yourself in the art of crafting pani puri and savor the magic of this South Asian delicacy.