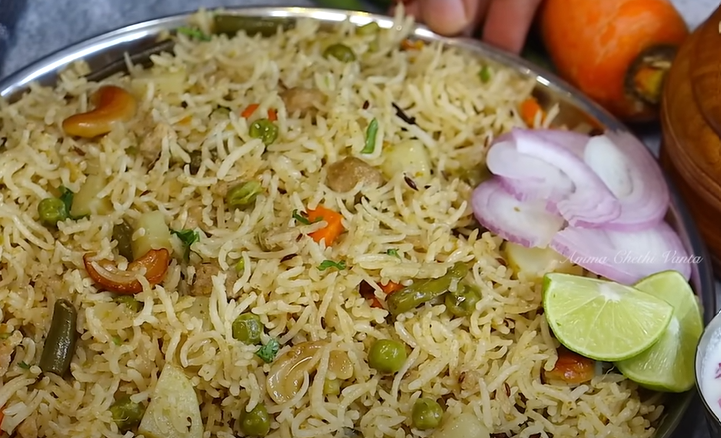
Gluten Free Pie Crust recipe

Introduction

A gluten-free pie crust can be just as delicious as the white-flour crusts from my childhood! It’s incredibly flaky with a classic rich, buttery flavor. Best of all, with a few simple techniques, making the perfect pie crust is easier than you might think.

Ingredients:

  • 1 1/4 cups gluten-free all-purpose flour (make sure it contains xanthan gum)
  • 1/4 teaspoon salt
  • 1/2 cup cold unsalted butter, diced
  • 1 large egg
  • 2-4 tablespoons ice water
  • 1 teaspoon apple cider vinegar

Instructions:

  1. Prepare the Dry Ingredients:
    • In a large bowl, whisk together the gluten-free flour and salt until well combined.
  2. Cut in the Butter:
    • Add the cold, diced butter to the flour mixture.
    • Use a pastry cutter or your hands to cut the butter into the flour until the mixture resembles coarse crumbs. The butter should be pea-sized.
  3. Add the Wet Ingredients:
    • In a small bowl, beat the egg, then add it to the flour and butter mixture.
    • Add the apple cider vinegar and 2 tablespoons of ice water to the mixture.
    • Stir gently with a fork until the dough begins to come together. If the dough is too dry, add additional ice water, 1 tablespoon at a time, until the dough holds together when pressed.
  4. Form the Dough:
    • Turn the dough out onto a lightly floured surface.
    • Gather it into a ball and flatten it into a disk.
    • Wrap the disk in plastic wrap and refrigerate for at least 1 hour, or until firm.
  5. Roll Out the Dough:
    • Remove the dough from the refrigerator and let it sit at room temperature for a few minutes to soften slightly.
    • Place the dough between two sheets of parchment paper or plastic wrap to prevent sticking.
    • Roll out the dough to fit your pie pan, about 1/8 inch thick.
  6. Transfer to the Pie Pan:
    • Carefully transfer the rolled-out dough to your pie pan. You can do this by rolling the dough around your rolling pin and then unrolling it over the pan.
    • Gently press the dough into the bottom and sides of the pan. Trim any excess dough hanging over the edges and crimp the edges if desired.
  7. Blind Baking (Optional):
    • If your recipe calls for a pre-baked crust, preheat your oven to 375°F (190°C).
    • Line the crust with parchment paper and fill with pie weights or dried beans.
    • Bake for 15 minutes, then remove the parchment paper and weights and bake for an additional 10-12 minutes, or until the crust is golden brown.
    • Allow the crust to cool completely before adding your filling.

Enjoy your gluten-free pie crust with your favorite filling!

A Guide to Making the Perfect Gluten-Free Yorkshire Pudding

Introduction Perfect Gluten-Free Yorkshire Pudding

Yorkshire pudding is a quintessential British side dish, traditionally served with roast beef and gravy. Its light, airy texture and golden-brown crust make it a favorite among many. However, if you follow a gluten-free diet, you might think this delightful dish is off-limits. Fear not! With a few tweaks and substitutions, you can enjoy delicious gluten-free Yorkshire puddings that rival the traditional version.

Understanding Yorkshire Pudding

Before diving into the gluten-free recipe, let’s explore what makes Yorkshire pudding so special. This classic dish is made from a simple batter of flour, eggs, and milk. The secret to its light and fluffy texture lies in the high heat used during baking, which causes the batter to rise and form a crisp exterior while remaining soft inside.

The Challenge of Gluten-Free Baking

Gluten is a protein found in wheat, barley, and rye. It gives dough its elasticity and helps it rise and maintain its shape. When baking without gluten, finding the right flour substitute is crucial to achieve a similar texture and taste. Thankfully, there are many gluten-free flour blends available that can mimic the properties of wheat flour.

Ingredients for Gluten-Free Yorkshire Pudding

To make gluten-free Yorkshire puddings, you will need the following ingredients:

  • 100g gluten-free plain flour (a blend that includes rice flour, potato starch, and tapioca flour works well)
  • 3 large eggs
  • 150ml milk (you can use dairy or a non-dairy alternative such as almond, soy, or oat milk)
  • 50ml water
  • A pinch of salt
  • 2 tablespoons vegetable oil or beef drippings

Step-by-Step Recipe

1. Preheat the Oven

Start by preheating your oven to 220°C (425°F) or 200°C (400°F) for fan ovens. It’s essential to have the oven at the right temperature to achieve the best rise for your puddings.

2. Prepare the Batter

In a mixing bowl, combine the gluten-free flour and a pinch of salt. Make a well in the center of the flour and add the eggs. Gradually whisk in the milk and water until you have a smooth batter. The consistency should be similar to heavy cream. Let the batter rest for at least 15 minutes. This resting period allows the flour to hydrate properly, which is crucial for achieving the right texture.

3. Heat the Oil

Place a small amount of vegetable oil or beef drippings in each compartment of a muffin tin (or a Yorkshire pudding tray if you have one). Place the tin in the preheated oven for about 10 minutes until the oil is very hot and starting to smoke. This step is essential as the hot oil will help the batter rise quickly, creating the characteristic puffiness of Yorkshire puddings.

4. Cook the Puddings

Carefully remove the hot tin from the oven. Quickly pour the batter into the hot oil, filling each compartment about halfway. Immediately return the tin to the oven and bake for 20-25 minutes without opening the oven door. Opening the door can cause the puddings to deflate. Bake until the puddings are puffed up and golden brown.

5. Serve

Remove the Yorkshire puddings from the tin and serve immediately. They are best enjoyed fresh from the oven, crisp on the outside and soft on the inside.

Tips for Perfect Gluten-Free Yorkshire Puddings

  1. Choose the Right Flour: Not all gluten-free flours are created equal. A blend specifically designed for baking will give you the best results. Look for a mix that includes rice flour, potato starch, and tapioca flour.
  2. Rest the Batter: Allowing the batter to rest before baking is crucial. This step helps the flour absorb the liquid fully, resulting in a smoother and more consistent batter.
  3. Use Hot Oil: The oil needs to be very hot to create the initial rise. Heating the oil in the oven before adding the batter ensures the perfect puff.
  4. Don’t Open the Oven Door: It might be tempting to check on your puddings, but opening the oven door can cause them to collapse. Be patient and wait until they are fully cooked.
  5. Serve Immediately: Yorkshire puddings are best served straight from the oven. They tend to lose their crispness if left to sit.

Variations and Serving Suggestions

While Yorkshire puddings are traditionally served with roast beef, they are versatile and can accompany various dishes. Here are a few ideas to get you started:

  1. Mini Yorkshire Puddings with Smoked Salmon and Cream Cheese: Fill mini puddings with a dollop of cream cheese and a slice of smoked salmon for an elegant appetizer.
  2. Yorkshire Pudding Wraps: Use large puddings as a wrap for roast beef, horseradish sauce, and fresh greens. It’s a unique and delicious way to enjoy a sandwich.
  3. Vegetarian Option: Serve your Yorkshire puddings with a rich mushroom and onion gravy for a satisfying vegetarian meal.
  4. Sweet Yorkshire Puddings: For a twist, try making sweet Yorkshire puddings by adding a bit of sugar to the batter. Serve with fresh berries and whipped cream for a delightful dessert.

Conclusion

Making gluten-free Yorkshire puddings might seem daunting, but with the right ingredients and techniques, it’s entirely possible to achieve delicious results. By following this recipe and incorporating the tips provided, you’ll be able to enjoy this classic British dish without compromising on taste or texture. Whether you serve them with a traditional roast or get creative with fillings and toppings, gluten-free Yorkshire puddings are sure to be a hit at your table. Happy baking!

Greens Filled Ravioli with Garlic Butter

Greens Filled Ravioli

Ingredients

For the Ravioli Dough:

  • 2 cups all-purpose flour
  • 3 large eggs
  • 1 tablespoon olive oil
  • 1/2 teaspoon salt
  • Water, as needed

For the Greens Filling:

  • 2 cups fresh spinach or any mixed greens (like kale, Swiss chard, or arugula), chopped
  • 1 cup ricotta cheese
  • 1/2 cup grated Parmesan cheese
  • 1 clove garlic, minced
  • 1/4 teaspoon nutmeg
  • Salt and pepper to taste

For the Garlic Butter Sauce:

  • 1/2 cup unsalted butter
  • 4 cloves garlic, minced
  • 1/4 cup fresh parsley, chopped
  • Salt and pepper to taste
  • Grated Parmesan cheese for serving

Instructions

Making the Dough:

  1. On a clean surface, make a mound with the flour. Create a well in the center.
  2. Crack the eggs into the well and add the olive oil and salt.
  3. Using a fork, gently beat the eggs and gradually incorporate the flour from the edges.
  4. Once the dough starts to come together, knead it with your hands until smooth and elastic, about 8-10 minutes. Add water a few drops at a time if the dough is too dry.
  5. Wrap the dough in plastic wrap and let it rest for at least 30 minutes.

Preparing the Filling:

  1. In a skillet, cook the chopped greens over medium heat until wilted. If using tougher greens like kale, cook until tender.
  2. Transfer the cooked greens to a bowl and let them cool.
  3. Once cooled, combine the greens with ricotta cheese, Parmesan cheese, minced garlic, nutmeg, salt, and pepper. Mix well.

Assembling the Ravioli:

  1. Divide the dough into two portions. Roll out each portion on a floured surface into thin sheets (about 1/16 inch thick).
  2. Place small mounds of filling (about a teaspoon each) onto one sheet of dough, spacing them about 2 inches apart.
  3. Brush around the filling with water and cover with the second sheet of dough. Press down around each mound to seal.
  4. Using a ravioli cutter or knife, cut out individual ravioli. Press the edges with a fork to ensure they are well sealed.
  5. Bring a large pot of salted water to a boil. Cook the ravioli in batches for 3-4 minutes, or until they float to the top. Remove with a slotted spoon.

Making the Garlic Butter Sauce Greens Filled Ravioli :

  1. In a large skillet, melt the butter over medium heat.
  2. Add the minced garlic and cook until fragrant and lightly golden, about 1-2 minutes.
  3. Stir in the chopped parsley and season with salt and pepper.

Serving:

  1. Gently toss the cooked ravioli in the garlic butter sauce.
  2. Serve immediately, topped with grated Parmesan cheese.

Enjoy your delicious homemade greens-filled ravioli with garlic butter sauce! see here more information

Mary Berry’s Cauliflower Cheese Recipe: A Classic Comfort Dish

Cauliflower Cheese

If you’re a fan of classic British comfort food, then Mary Berry’s Cauliflower Cheese recipe is a must-try. Renowned for her impeccable cooking skills and easy-to-follow recipes, Mary Berry has created a Cauliflower Cheese dish that’s not only delicious but also perfect for any occasion. In this post, we’ll delve into the details of this fantastic recipe, offer tips for perfecting it, and address some frequently asked questions.

Why Mary Berry’s Cauliflower Cheese?

Mary Berry is a beloved figure in British culinary circles, known for her straightforward approach and ability to make even the most complex dishes seem easy. Her Cauliflower Cheese recipe is a prime example of her culinary genius. This dish combines tender cauliflower with a rich, cheesy sauce that’s both comforting and indulgent.

Ingredients for Mary Berry’s Cauliflower Cheese

To recreate Mary Berry’s Cauliflower Cheese at home, you’ll need the following ingredients:

  • 1 large cauliflower: Trimmed into florets
  • 30g unsalted butter
  • 30g all-purpose flour
  • 500ml milk: Whole milk is preferred for a creamier texture
  • 200g cheddar cheese: Grated
  • 50g Parmesan cheese: Grated
  • Salt and pepper: To taste
  • 1/2 teaspoon Dijon mustard: Optional but adds a lovely depth of flavor
  • A pinch of nutmeg: Optional but adds a subtle warmth

Instructions

Step 1: Prepare the Cauliflower

  1. Preheat your oven to 200°C (180°C for fan ovens) or 400°F.
  2. Boil a large pot of salted water and add the cauliflower florets.
  3. Cook the cauliflower for about 5-7 minutes until just tender. You want it to be slightly undercooked as it will continue to cook in the oven.
  4. Drain the cauliflower and set aside.

Step 2: Make the Cheese Sauce

  1. Melt the butter in a saucepan over medium heat.
  2. Add the flour and stir continuously to create a roux. Cook for about 1-2 minutes until the mixture is bubbling and has a slightly nutty aroma.
  3. Gradually whisk in the milk, making sure there are no lumps. Continue to cook, stirring frequently, until the sauce thickens.
  4. Add the grated cheddar cheese and Parmesan cheese to the sauce, stirring until melted and smooth.
  5. Season with salt, pepper, Dijon mustard, and nutmeg if using. Adjust the seasoning to taste.

Step 3: Assemble and Bake

  1. Place the cooked cauliflower in a baking dish.
  2. Pour the cheese sauce over the cauliflower, making sure it’s evenly coated.
  3. Sprinkle a little extra cheese on top if desired for a crispy topping.
  4. Bake in the preheated oven for 20-25 minutes, or until the top is golden and bubbly.

Tips for Perfect Cauliflower Cheese

  1. Use good-quality cheese: The flavor of the cheese sauce is crucial, so choose a mature cheddar and freshly grated Parmesan.
  2. Don’t overcook the cauliflower: You want it to hold its shape and texture after baking.
  3. Make it ahead: This dish can be prepared in advance and refrigerated. Simply reheat in the oven before serving.

FAQs

To ensure you have all the information you need to make Mary Berry’s Cauliflower Cheese perfectly, we’ve compiled a list of frequently asked questions.

QuestionAnswer
Can I use frozen cauliflower?Yes, you can use frozen cauliflower. Make sure to thaw it thoroughly and drain any excess moisture before cooking.
Can I substitute the cheese?While cheddar and Parmesan are recommended, you can experiment with other cheeses. Gruyère or Gouda can add a different flavor profile.
Can I make this dish vegetarian?Yes, the recipe is already vegetarian. Just ensure the cheese used is suitable for vegetarians (some cheeses contain rennet).
How do I store leftovers?Store leftovers in an airtight container in the fridge for up to 3 days. You can also freeze the dish for up to 3 months. Reheat thoroughly before serving.
Can I make this dish ahead of time?Absolutely! Prepare the dish as directed, then cover and refrigerate. Bake it just before serving. If baking from cold, you may need to add a few extra minutes to the cooking time.
How can I make the topping extra crispy?For an extra crispy topping, add some breadcrumbs mixed with a little melted butter on top of the cheese sauce before baking.
Can I add other vegetables to this dish?Yes, you can mix in other vegetables like cooked broccoli, or mushrooms. Just make sure they are cooked before adding to the cheese sauce.

Related Recipes

Additional Resources

Mary Berry’s Cauliflower Cheese is a delightful dish that’s perfect for any meal. Whether you’re hosting a dinner party or just looking for a comforting side, this recipe will not disappoint. Happy cooking!

Ultimate Mince Pies Recipe: Perfect for the Holidays

tradition minace pie

Mince pies are a classic British Christmas treat, traditionally filled with a mixture of dried fruits, spices, and often a bit of brandy or other spirits. Here’s a traditional recipe to help you make these festive treats at home.

Ingredients

For the Mincemeat:

  • 200g suet (beef or vegetarian)
  • 250g dark brown sugar
  • 1 large Bramley apple, peeled, cored, and finely chopped
  • 350g raisins
  • 225g sultanas
  • 225g currants
  • 100g mixed peel
  • Zest and juice of 1 lemon
  • Zest and juice of 1 orange
  • 50g chopped almonds
  • 1 tsp ground cinnamon
  • 1 tsp ground nutmeg
  • 1/2 tsp ground cloves
  • 1/2 tsp ground ginger
  • 4 tbsp brandy or rum

For the Pastry:

  • 375g plain flour
  • 260g unsalted butter, diced and chilled
  • 125g caster sugar
  • 1 large egg
  • A pinch of salt
  • Icing sugar for dusting

Instructions

Prepare the Mincemeat:

  1. In a large bowl, combine all the mincemeat ingredients except for the brandy.
  2. Mix thoroughly to ensure the spices and fruits are evenly distributed.
  3. Cover the bowl and leave it to sit in a cool place for at least 12 hours, preferably overnight.
  4. After the mixture has sat, stir in the brandy.
  5. Transfer the mincemeat to sterilized jars and store in a cool, dark place. It can be made well in advance and improves with age.

Prepare the Pastry:

  1. In a large bowl, mix the flour and salt.
  2. Add the chilled butter and rub it into the flour with your fingertips until the mixture resembles breadcrumbs.
  3. Stir in the sugar.
  4. Beat the egg and add it to the mixture. Mix until it comes together to form a dough. Add a little cold water if needed.
  5. Shape the dough into a ball, wrap in cling film, and chill in the fridge for 30 minutes.

Assemble and Bake the Pies:

  1. Preheat the oven to 200°C (400°F) or 180°C (350°F) for a fan oven.
  2. Roll out the pastry on a lightly floured surface to about 3mm thickness.
  3. Use a round cutter (about 9cm) to cut out circles for the bases. Gently press these into a muffin tin.
  4. Fill each pastry base with a heaped teaspoon of mincemeat.
  5. Use a smaller round cutter (about 7cm) or a star-shaped cutter to cut out the lids. Place these on top of the mincemeat, pressing the edges gently to seal.
  6. Brush the tops with a little beaten egg or milk.
  7. Bake in the preheated oven for 20-25 minutes, or until the pastry is golden brown.
  8. Allow the pies to cool in the tin for a few minutes, then transfer to a wire rack to cool completely.
  9. Dust with icing sugar before serving.

Enjoy your traditional mince pies warm or cold, with a cup of tea or a glass of mulled wine! also see here for more info and latest blog on this content is also here