The Art of Crafting Fragrant Shredded Chicken Curry Bao

Introduction

Bao, with their soft, fluffy exteriors and fragrantly spicy middles, are a culinary delight that originated in China. Also known as baozi, these Chinese filled buns come in various forms, often steamed to perfection. In this culinary journey, we explore the art of creating bao filled with a fragrant shredded chicken curry, an exquisite blend of flavors that dance on the taste buds.

Section 1: Unveiling the Aromas – Fragrant Shredded Chicken Curry Filling

Bao Filling Ingredients

  • 3 tbsp. oil
  • 2 small shards cinnamon
  • 1/2 tsp. nigella seeds
  • 70 g onion, thinly sliced
  • 1/8 tsp. fenugreek seeds
  • 200 g boneless skinless chicken thigh, cut into chunks
  • 1/2 tbsp. garlic paste
  • 1 tsp. turmeric
  • 1 tsp. dried red chilli flakes
  • 1/2 tsp. ground coriander
  • 1/4 tsp. salt
  • 1/4 tsp. pepper
  • 2 tomatoes, diced
  • 200 ml water
  • 1 tbsp. coriander, finely chopped
  • 1 green finger chilli, thinly sliced

Preparing the Filling

To embark on the journey of creating the perfect bao, we start by crafting a fragrant shredded chicken curry filling. Sautéing spices, searing chicken, and allowing the flavors to meld together create a curry that is both aromatic and rich. The addition of coriander and green chilli brings a fresh and vibrant element to the filling.

Section 2: Mastering the Bao Dough

Bao Dough Ingredients

  • 150 g flour
  • 1/2 tsp. yeast
  • 1/2 tsp. sugar
  • 1/2 tbsp. oil
  • 70 ml water

Crafting the Bao Dough

The heart of any bao lies in its dough. With a few simple ingredients – flour, yeast, sugar, oil, and water – one can embark on the path of creating the perfect vessel for the flavorful filling. Whether using a stand mixer or kneading by hand, the goal is a smooth and elastic dough. Allowing the dough to prove in a warm place for two hours is the key to achieving the desired softness.

Section 3: Bringing it All Together – Bao Assembly

Assembling the Bao

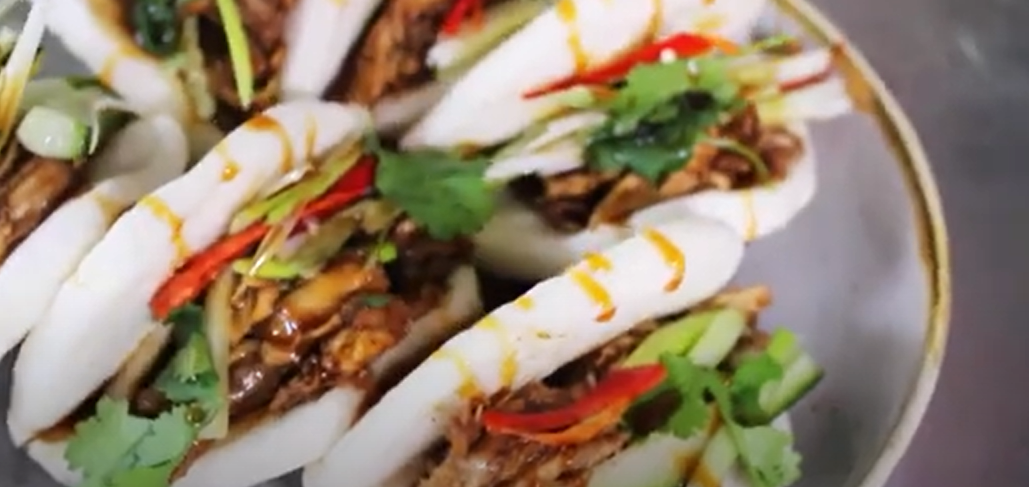
The assembly of bao is an art that requires patience and precision. Rolling out the thinly kneaded dough, creating a flavorful pocket with the fragrant shredded chicken curry, and pleating and sealing – each step contributes to the final masterpiece. The satisfaction of lifting the lid off the steamer and seeing these bao puffed up and fragrant is unparalleled.

Step-by-Step Assembly

  1. Dough Preparation: After the dough has proved, it is turned onto a floured surface and kneaded by hand before being rolled out into a thin rectangle.
  2. Filling Creation: The fragrant shredded chicken curry, cooled and refrigerated, awaits its destiny as the heart of the bao.
  3. Pleating and Sealing: The artistry begins as each disc of dough is filled, pleated, and sealed to create a series of delicate pleats around the flavorful core.
  4. Final Touch: Reshaping the bao into a circle, they are placed on a sheet of greaseproof paper and left to prove for an additional 20 minutes.

Section 4: The Culmination – Steaming and Serving

Steaming the Bao

The final act in this culinary masterpiece is the steaming process. Placing the filled bao buns in a hot steamer, a tantalizing aroma fills the air as they puff up to perfection. Steaming for 15 minutes ensures that the bao are cooked to perfection, ready to be served with your favorite dipping sauce or enjoyed as they are.

Conclusion

In the world of culinary delights, crafting fragrant shredded chicken curry bao is a journey worth undertaking. From the aromatic filling to the soft and fluffy dough, each element plays a crucial role in creating a sensory experience that transcends the ordinary. So, don your apron, gather the ingredients, and embark on a culinary adventure that celebrates the art of bao making.


The Art of Making Homemade Honeycomb

Introduction

Discovering the art of making your own honeycomb at home is not only immensely satisfying but also a delightful lesson in the science of cookery. Commonly known as cinder toffee or hokey pokey, this sweet and crunchy treat is easy to make, and the quick process is both a spectacle and a joy. In this comprehensive guide, we’ll explore the ingredients, equipment, and steps involved in creating this delightful confection.

Homemade Honeycomb
Homemade Honeycomb

Ingredients: Simple Yet Essential

To embark on your honeycomb-making journey, gather the basic yet essential ingredients: sugar, golden syrup, and bicarbonate of soda. These three components, when combined in a precise manner, transform into an aerated foam that becomes airy and brittle once set.

The Right Pan for the Job

Choosing the correct pan is crucial for a successful honeycomb adventure. Opt for a heavy-bottomed pan with high sides, as the mixture will foam up and rise rapidly once bicarbonate of soda is added. This pan ensures a safe and controlled cooking environment.

Golden Syrup Substitute

Encountered a pantry predicament without golden syrup? Fear not! Honey serves as an excellent substitute, ensuring the sweetness and stickiness required for your honeycomb creation.

Mastering the Cooking Process

Testing Readiness

Knowing when your honeycomb mixture is ready requires careful attention. Stir the sugar to dissolve it, but avoid letting the mixture come to a boil. Once the sugar has completely melted, increase the heat slightly and bring it to a simmer until it turns bubbly and amber in color. Aim for a hue resembling maple syrup; any darker, and the honeycomb may taste bitter.

Incorporating Bicarbonate of Soda

After achieving the desired caramelization, quickly remove the pan from heat to prevent further cooking. Add the bicarbonate of soda and stir vigorously with a wooden spoon until well combined. Witness the magical transformation as the bicarbonate turns the caramel into a bubbling, golden foam, creating characteristic pockets reminiscent of a sponge.

Setting the Honeycomb

The foamy mixture is ready to be poured into a buttered tin or dish lined with greaseproof paper. Exercise caution during this step, as the mixture is extremely hot. Allow it to set for a few hours, ensuring a safe distance from small children. Once fully cooled, break the honeycomb into shards or chunks, making it easier to enjoy.

Culinary Creativity with Honeycomb

Chocolate Dipping Delight

Take your honeycomb experience to the next level by dipping the pieces into melted chocolate, creating a homemade version of a Crunchie. For added texture, press nuts or dried fruit into the chocolate before it sets.

Versatile Culinary Companions

Explore various culinary possibilities with honeycomb. Mix it into a batch of Rocky Road, sprinkle it over frosted cupcakes, crumble it on top of iced cookies, or swirl it into a soft-set ice cream. Let your creativity run wild!

Storage Tips for Long-lasting Enjoyment

To ensure your cinder toffee maintains its delectable freshness, store it in an airtight container in a dry spot, such as your pantry. Proper storage enhances its shelf life, allowing you to savor the sweetness over an extended period.

Recipe: Crafting Your Own Honeycomb

Ingredients

  • 200 g caster sugar
  • 75 g golden syrup (or honey as a substitute)
  • 2 tsp. bicarbonate of soda

Directions

  1. Grease and line a deep baking tray, dish, or tin with parchment paper.
  2. In a large, heavy-bottomed, high-sided saucepan over low heat, melt caster sugar and golden syrup without letting the mixture bubble.
  3. Increase the heat until the mixture simmers, turning the caramel amber in color.
  4. Remove from heat, add bicarbonate of soda, and beat vigorously until dissolved and foamy.
  5. Pour the mixture into the prepared tin, being cautious due to its high temperature.
  6. Allow it to set for 1 to 1.5 hours, then crumble or snap into shards for versatile enjoyment.

Embark on this culinary adventure, and enjoy the delightful process of making your own honeycomb – a treat that combines science, art, and pure joy in every bite.