Delightful Blackberry and Tahini Cake making

Tahinicake-foodfebles

Blackberry and Tahini Cake

Certainly! A Blackberry and Tahini Cake is a delightful combination that brings together the fruity sweetness of blackberries and the rich, nutty flavor of tahini.

Here’s a simple recipe for you to try:

Ingredients:

For the Cake:

  • 225g butter
  • 125g light brown sugar
  • 100g caster sugar
  • 3 large eggs
  • 80g tahini
  • 250g self-raising flour
  • 1 tsp. ground cinnamon
  • 1 tsp. ground ginger
  • 200g blackberries, plus extra to decorate

For the Icing:

  • 150g butter, softened
  • 400g icing sugar
  • 3 tbsp. tahini
  • 150g blackberry jam

Directions:

  1. Preheat and Prepare:
    • Preheat the oven to 190°C (170°C Fan).
    • Grease and line a 20cm round cake tin.
  1. Cream Butter and Sugar:
    • In a large mixing bowl, beat butter and light brown sugar until pale and fluffy.
  1. Add Eggs and Tahini:
    • Add eggs one at a time, mixing well.
    • Stir in tahini until combined.
  1. Prepare Dry Ingredients:
    • In another bowl, sieve together self-raising flour, cinnamon, and ginger.
    • Add 200g blackberries, stir to coat in flour.
  1. Combine Wet and Dry Ingredients:
    • Add the dry ingredients to the wet mixture. Stir until just combined, avoiding over-mixing.
    • Bake for 45 minutes or until cooked through and golden. Allow to cool and then remove from the tin.
  1. Prepare Icing:
    • In a bowl, beat together softened butter, icing sugar, and tahini until light and fluffy.
  1. Assemble:
    • Using a wooden spoon, poke 16 holes into the cake.
    • Spread blackberry jam over the cake, ensuring it goes into the holes.
    • Spread the tahini icing over the cake.
  1. Final Touch:
    • Decorate with remaining blackberries.

This flavorsome blackberry cake with tahini is now ready to be enjoyed as a show-stopping dessert!

Crafting the Perfect Homemade Lemonade

Introduction

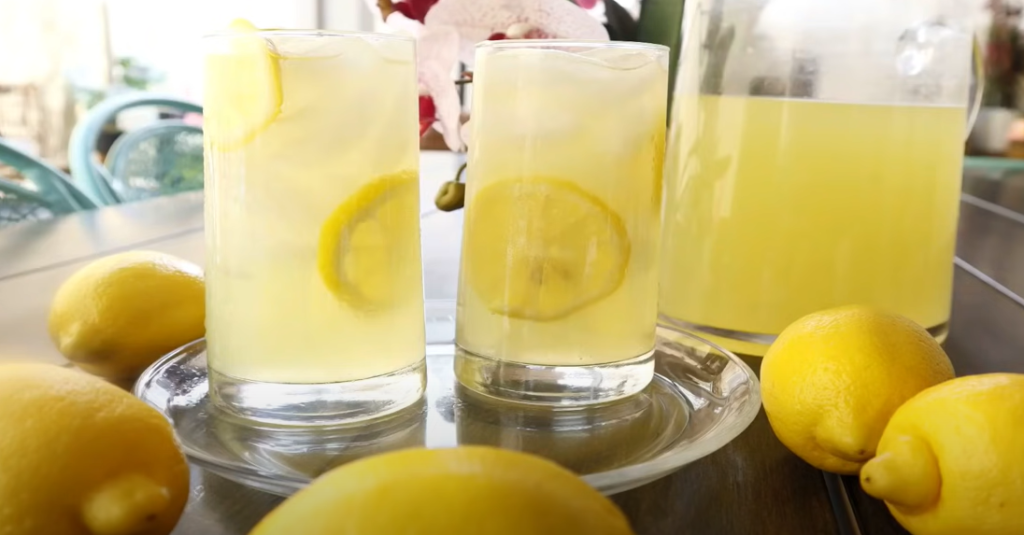
Tart, zesty, and sweet, homemade lemonade is a quintessential summer beverage that tantalizes your taste buds. Whether you prefer it still or sparkling, sweet or bitter, this guide has everything you need to create the perfect glass of lemony goodness. From crafting the ideal sugar syrup to choosing the right ice and garnishes, let’s embark on a journey to elevate your homemade lemonade game.

The Foundation: Creating the Sugar Syrup

  1. Sugar Syrup Magic

The base of traditional lemonade lies in a carefully crafted sugar syrup. Achieving the right balance of sweetness and lemony flavor requires dissolving sugar and lemon peel in just-boiled water. Learn the art of making this essential syrup that can also be a versatile addition to various cocktails.

  1. Juicing Mastery

To extract the maximum juice from your lemons, bring them to room temperature and give them a good roll on the countertop. Discover the technique that loosens the fruit and releases the juice, ensuring you get the most out of every lemon. Pro tip: a quick stint in the microwave can further soften lemons for an extra juice boost.

Customizing Your Lemonade

  1. Water Wonders

Still or sparkling? The choice is yours! Uncover the secrets of creating a fizzy lemonade with sparkling water or savor the simplicity of an old-school treat with still water. Adjust the lemon juice levels to cater to your taste preferences, whether you’re craving tartness or a milder tang for the little ones.

  1. Ice, Ice, Baby

Explore the world of ice and its impact on your lemonade experience. Smashed ice for a slushy barbecue delight, jangly ice cubes or balls for a leisurely swish, or big blocks that melt slowly – each type plays a role in enhancing your lemonade pleasure without diluting its flavor.

  1. Garnishing Elegance

Elevate your basic lemonade with enticing garnishes. Mint sprigs, thin lemon slices, or lime wedges add layers of flavor. Uncover the trick to achieving a deliciously sour rim by dunking glasses in lemon juice followed by sugar. For a sour candy mocktail, sprinkle citric acid in the sugar before coating the rim.

Exploring Bitter Variations

  1. Lickety-Split Lemonade

For those seeking a bitter twist, embark on the journey of a lickety-split lemonade. This old-school version involves slicing lemons, removing seeds and pith, and blending them with water, sugar, and ice. Strain the mixture for a cloudier appearance and a more bitter profile. Adjust the bitterness by experimenting with peel removal and sieving techniques.

  1. Whipped Lemonade Delight

Take your lemonade experience to the next level with a decadent treat – whipped lemonade. Combine condensed milk, squirty cream, lemon juice, and ice in a blender for a luscious, creamy delight that indulges your senses.

Recipe for Perfection

Ingredients:

  • 5-6 unwaxed lemons
  • 200 g granulated sugar
  • 250 ml water
  • 1 l water (or sparkling water, soda, or your preferred choice)

Directions:

  1. Remove lemon peel, avoiding the white pith. Juice the lemons, setting the juice aside.
  2. In a saucepan, combine sugar, lemon peel, and water. Boil, stirring continuously until sugar dissolves.
  3. Remove from heat, add lemon juice, and let it cool. Strain into a bottle or jug, and chill.
  4. Serve as desired, with water, sparkling water, and your favorite garnishes.

Now armed with this comprehensive guide, unleash your creativity and embark on a journey to master the art of homemade lemonade. Cheers to refreshing moments and the satisfaction of crafting the perfect glass!

The Art of Making A Crispy Delight Aloo Paratha

Introduction

Aloo Paratha, a beloved Indian dish, is a delightful combination of crispy, buttery flatbread and spiced mashed potatoes. Prepared on a flat pan known as a tava, this culinary masterpiece can be enjoyed as a breakfast treat or a satisfying meal. In this detailed guide, we’ll explore the art of making Aloo Paratha from scratch, step by step, ensuring that every bite is a perfect blend of flavors and textures.

Ingredients for Aloo Paratha

To embark on this culinary journey, gather the following ingredients:

  • 370 g atta flour
  • 300 ml warm water
  • 1 tsp. salt
  • 600 g cooked potatoes, lightly mashed
  • 1 medium onion, finely chopped
  • 1 green finger chilli, finely chopped
  • 1/2 tsp. each turmeric, garlic powder, and chilli flakes
  • 3/4 tsp. black pepper
  • 1 tsp. salt
  • 1 tbsp. chopped coriander
  • 8 tbsp. butter or oil

Making the Paratha Dough

Step 1: Mixing the Dough

  1. Place atta flour, salt, and water in a mixer, combining them on a low setting until a soft, non-sticky dough forms.
  2. Set the mixer to medium and knead for five minutes.
  3. Allow the dough to rest for at least 20 minutes, making it easier to roll out.

Preparing the Potato Filling

Step 2: Creating the Filling

  1. In a bowl, combine mashed potatoes, finely chopped onion, green chilli, turmeric, garlic powder, chilli flakes, black pepper, salt, and chopped coriander.
  2. Mix the ingredients thoroughly using your hands and divide the filling into 8 balls.

Rolling and Stuffing the Paratha

Step 3: Shaping the Dough

  1. Divide the rested dough into 8 balls and cover them with a wet tea towel to prevent drying.

Step 4: Rolling and Stuffing

  1. Lightly dust the counter with flour.
  2. Roll out one ball of dough into a 15cm disc.
  3. Spread a teaspoon of butter or oil over the disc and place a potato filling ball on top.
  4. Gather the edges of the dough to fully cover the filling, twisting to seal it closed.

Step 5: Rolling Out

  1. Place the stuffed dough sealed side down on the counter.
  2. Pat it out gently with fingers, preventing filling escape.
  3. Roll out the dough to about 25cm using a rolling pin, ensuring specks of filling are visible.

Cooking the Aloo Paratha

Step 6: Pan Preparation

  1. Heat a pan to medium (a crepe pan can be a great alternative to a tava).
  2. Gently dust excess flour off the paratha and place it on the pan for 20-30 seconds.

Step 7: Initial Cooking

  1. Flip the paratha and spread a teaspoon of butter or oil.
  2. After 30 seconds, flip it again, buttering the other side.

Step 8: Final Cooking

  1. Allow the paratha to cook until small brown spots appear.
  2. Flip it for the final time, press gently with a spatula, and wait for brown spots to crisp up.

Step 9: Serving

Serve the Aloo Paratha immediately while it’s crisp and buttery, accompanied by refreshing raita and spicy chilli pickle.

Conclusion

Making Aloo Paratha is not just a culinary process; it’s an art form that combines skill and creativity. With these detailed steps, you can create a crispy, flavorful delight that will transport your taste buds to the streets of India. Enjoy the magic of Aloo Paratha and savor each moment as you master the art of its creation.


Delightful Carrot Cake Traybake with Ricotta Frosting

carrot_cake

Introduction

Embracing the spirit of spring, the carrot cake traybake emerges as a favorite among bakers seeking a delightful, seasonal treat. This unique recipe not only features the customary warming spices and orange zest but also introduces a twist with a ricotta frosting that adds a deliciously light and tangy dimension to the classic cream cheese topping. Unconventional yet harmonious, the addition of thyme provides a subtle herbal undertone, creating a cake that is not only visually appealing but also a symphony of flavors.

Ingredients for Carrot Cake

The Foundation of Flavor

The first step towards crafting this delectable carrot cake involves gathering a set of quality ingredients. The combination of these elements plays a crucial role in achieving the perfect balance of sweetness, spiciness, and herbal notes. Here’s what you’ll need:

  • Soft butter for greasing
  • 200 g plain flour
  • 1 tsp. bicarbonate of soda
  • 1 tsp. baking powder
  • 200 g soft light brown sugar
  • 2 tsp. ground cinnamon
  • 1 mixed spice
  • 1/4 tsp. ground cloves
  • Zest of 1 orange
  • 200 g peeled and coarsely grated carrots (about 3 medium carrots)
  • 100 g walnuts, roughly chopped
  • 200 ml vegetable oil
  • 3 large eggs, beaten

Crafting the Foundation

To prepare the cake base, meticulous attention is required to combine these ingredients effectively. The process involves a careful orchestration of flavors and textures:

Step 1: Mixing and Baking

  1. Preheat the oven: Begin by preheating the oven to 180 ºC (160º Fan) mark 4. Prepare a 20cm x 30cm x 5cm deep baking tin by greasing and lining it.
  2. Combine the ingredients: In a large mixing bowl, blend all the cake ingredients thoroughly using a large metal spoon or spatula until a well-combined batter is achieved.
  3. Transfer to the tin: Place the batter into the lined tin and ensure it is evenly spread into the corners.

Step 2: Baking Perfection

  1. Bake: Allow the cake to bake on the middle shelf of the oven for 35-40 minutes. The desired result is a golden, well-risen cake with a clean skewer test indicating its readiness.
  2. Cooling Process: Once baked, let the cake cool in the tin for 10 minutes. Then, carefully transfer it to a wire rack to cool completely.

Crafting the Ricotta Frosting

The crowning glory of this carrot cake traybake lies in its ricotta frosting, a luscious blend of textures and flavors that elevate the dessert experience.

Ingredients for Ricotta Frosting

  • 250 g tub ricotta
  • 100 g soft unsalted butter
  • Zest of ½ orange, plus extra to decorate
  • 175 g icing sugar
  • 2 tsp. fresh thyme leaves, picked and finely chopped

Step-by-Step Frosting Magic

Step 3: Preparing the Frosting

  1. Frosting creation: While the cake bakes, focus on crafting the ricotta frosting. In a medium mixing bowl, combine ricotta, soft unsalted butter, orange zest, icing sugar, and half the thyme.
  2. Beating to perfection: Employ an electric mixer to beat the ingredients until well combined and fluffy, typically taking 2-3 minutes. Despite its initial looseness, the mixture will firm up upon chilling.

Step 4: Final Flourish

  1. Chill the frosting: Cover and chill the frosting for about an hour to allow it to firm up slightly.
  2. Assembling the masterpiece: Once the cake has cooled completely, generously spread the ricotta frosting over it, creating a smooth and tantalizing surface.
  3. Finishing touches: Scatter the remaining thyme and additional orange zest over the frosting, adding a visual and aromatic finale to this springtime masterpiece.

Storage Tips

To ensure the longevity of this delectable creation, it is recommended to follow these storage guidelines:

  • Refrigeration: Cover and store the cake in the refrigerator for 2-3 days, maintaining its freshness and preserving the rich flavors.

Conclusion

In summary, the carrot cake traybake with ricotta frosting presents itself as a delightful culinary journey. From the carefully chosen ingredients to the meticulous preparation of the cake and the exquisite ricotta frosting, every step contributes to a symphony of flavors and textures. This recipe not only caters to the taste buds but also serves as a testament to the creativity and versatility that can be infused into traditional bakes. Perfect for springtime celebrations or as a comforting treat, this carrot cake traybake with ricotta frosting is a masterpiece waiting to be savored.

The Art of Crafting Perfect Pierogi Rusike

A Journey into Polish Comfort Cuisine

Introduction: Pierogi, the epitome of Polish comfort food, are delectable filled dumplings that invite you to embark on a culinary adventure. Much like their counterparts, ravioli, mantoo, or gyoza, these versatile morsels can be filled with an array of ingredients, ranging from savory minced meat to sweet jams. In this recipe, we delve into the world of pierogi ruskie, filled with a delightful combination of caramelized onions, potatoes, and a blend of cottage and cheddar cheese.


  1. The Heart of Pierogi: The Dough Creating the perfect pierogi begins with mastering the art of crafting the dough. This section guides you through the process, emphasizing the importance of allowing the dough to rest for enhanced texture and ease of handling.

Ingredients:

  • 230 g flour
  • 1 egg
  • 1/2 tbsp. oil
  • 1/2 tsp. salt
  • 75 ml warm water
  • 1 1/2 tbsp. salted butter

Directions: Step 1: Begin with the dough, combining the ingredients in a stand mixer. Refrigerate the dough, allowing it to rest for optimal results.

Step 2: A crucial step in pierogi preparation involves caramelizing onions, infusing a rich flavor that elevates the dish. Learn the art of achieving the perfect caramelization.

  1. Pierogi Ruskie Filling: A Symphony of Flavors The soul of any pierogi lies within its filling. Uncover the secrets to creating a tantalizing mixture of potatoes, cheeses, and caramelized onions, perfectly balanced for a taste of authentic pierogi ruskie.

Ingredients:

  • 90 g onion, diced
  • 100 g cooked potatoes, roughly mashed
  • 90 g cottage cheese
  • 15 g cheddar cheese, grated
  • 1/4 tsp. pepper
  • 1 tsp. oil
  • 1 tbsp. chopped chives

Directions: Step 3: Combine potatoes, cheeses, cooled onions, and pepper for a harmonious filling. Dive into the sensory experience of mixing these ingredients by hand.

III. Crafting the Perfect Pierogi: From Dough to Dumpling The crafting of pierogi involves a meticulous process, from rolling out the dough to sealing the edges with finesse. Learn how to assemble these delectable dumplings for a culinary masterpiece.

Directions: Step 4: Assembling the pierogi requires skill and precision. Uncover tips on rolling out the dough to the ideal thickness and creating perfectly sealed dumplings using a simple cookie cutter or glass.

Step 5: Boiling pierogi is the traditional method, and this section takes you through the process, ensuring your dumplings are cooked to perfection. Learn the art of identifying when pierogi are ready and the key to preventing sticking.

Step 6: For those who prefer a crispier texture, discover the alternative method of pan-frying pierogi. Explore the nuances of achieving a golden brown exterior while maintaining a tender interior.

  1. Serving Up Culinary Delight: A Feast for the Senses The final act of the pierogi journey involves serving up a visual and flavorful feast. From a shower of caramelized onions to a sprinkle of fresh chives, learn how to present your pierogi ruskie with flair.

Directions: Step 7: Discover the art of presentation as you pour remaining butter over the pierogi and garnish with chives and reserved caramelized onions. Dive into the sensory experience of savoring pierogi while they are hot.

Conclusion: Embark on a culinary journey through the creation of pierogi ruskie, where each step unveils the secrets to crafting the perfect Polish comfort food. Whether you savor the traditional boiled version or indulge in the crispiness of pan-fried pierogi, the art of making these dumplings is a testament to the rich tapestry of global cuisine. So, roll up your sleeves and immerse yourself in the delightful world of pierogi crafting.