Mary Berry Cauliflower Cheese Recipe: A Timeless Comfort Food

mary berry cauliflower cheese

If you’re a fan of classic British cuisine, you’ve probably heard of Mary Berry—a culinary icon known for her delicious, approachable recipes. Among her many beloved dishes, Mary Berry’s Cauliflower Cheese stands out as a timeless comfort food that’s perfect for any occasion. Whether you’re preparing a family dinner, a festive feast, or just craving something hearty, this recipe is sure to delight. In this post, we’ll dive into Mary Berry’s Cauliflower Cheese recipe, explore tips for making it perfectly creamy and cheesy, and address some common questions in our FAQ section.

Why Mary Berry Cauliflower Cheese?

Mary Berry Cauliflower Cheese is more than just a side dish; it’s a celebration of simplicity and flavor. This recipe features tender cauliflower enveloped in a rich, cheesy sauce that’s baked until bubbly and golden. The combination of flavors and textures makes it a versatile dish that pairs beautifully with roast meats, hearty salads, or even as a standalone vegetarian option.

Key Features of Mary Berry Cauliflower Cheese:

  • Creamy and Cheesy: The sauce is made with a blend of cheddar and Gruyère cheese, creating a luscious, gooey texture.
  • Simple Ingredients: Common pantry staples make this recipe easy to whip up.
  • Versatile Dish: Perfect as a side or a main vegetarian dish.

Mary Berry Cauliflower Cheese Recipe

Ingredients:

  • 1 large cauliflower, cut into florets
  • 50g unsalted butter
  • 50g plain flour
  • 600ml milk
  • 100g mature cheddar cheese, grated
  • 100g Gruyère cheese, grated
  • 1 tsp Dijon mustard
  • Salt and black pepper to taste
  • 50g fresh breadcrumbs (optional, for topping)
  • 1 tbsp chopped fresh parsley (optional, for garnish)

Instructions:

  1. Prepare the Cauliflower: Preheat your oven to 200°C (180°C fan)/400°F/Gas Mark 6. Bring a large pot of salted water to a boil. Add the cauliflower florets and cook for 5-6 minutes until just tender. Drain well and set aside.
  2. Make the Cheese Sauce: In a saucepan, melt the butter over medium heat. Add the flour and cook, stirring constantly for about 1 minute to create a roux. Gradually whisk in the milk, ensuring there are no lumps. Continue to cook, stirring, until the sauce thickens and is smooth. Remove from heat and stir in the grated cheddar and Gruyère cheese until melted and fully combined. Add Dijon mustard, salt, and black pepper to taste.
  3. Combine and Bake: Place the cooked cauliflower in a baking dish. Pour the cheese sauce over the cauliflower, ensuring all florets are well-coated. If desired, sprinkle the fresh breadcrumbs on top for a crunchy topping. Bake in the preheated oven for 20-25 minutes, or until the top is golden and bubbly.
  4. Serve: Garnish with chopped parsley if desired. Serve hot as a side dish or a main course.

Tips for Perfect Cauliflower Cheese

  • Cook the Cauliflower Just Right: Avoid overcooking the cauliflower in the boiling water. It should be tender but still firm enough to hold its shape.
  • Smooth Sauce: Ensure the cheese sauce is completely smooth before adding the cauliflower. A smooth sauce will coat the florets evenly.
  • Breadcrumb Topping: For extra crunch, add fresh breadcrumbs mixed with a bit of melted butter to the top before baking.

Nutritional Information

A serving of Mary Berry’s Cauliflower Cheese provides approximately:

  • Calories: 350
  • Fat: 25g
  • Protein: 15g
  • Carbohydrates: 15g

These values may vary based on the exact ingredients and portion sizes used.

FAQs About Mary Berry Cauliflower Cheese

QuestionAnswer
Can I make this recipe ahead of time?Yes, you can prepare the cauliflower and cheese sauce in advance. Assemble the dish, cover it, and refrigerate for up to 24 hours. Bake as instructed before serving.
Can I use different cheeses?Absolutely! While cheddar and Gruyère are recommended, you can experiment with other cheeses like mozzarella or Parmesan for different flavors and textures.
Can I freeze Cauliflower Cheese?Yes, you can freeze the dish after baking. Allow it to cool completely, then transfer it to an airtight container and freeze for up to 3 months. Reheat thoroughly before serving.
Is there a gluten-free option?To make the dish gluten-free, use a gluten-free flour blend in place of plain flour and ensure all other ingredients are gluten-free.

For more delicious recipes and cooking tips, check out these resources:

Conclusion

Mary Berry’s Cauliflower Cheese is a classic dish that brings comfort and satisfaction to any meal. Its creamy cheese sauce and tender cauliflower make it a crowd-pleaser that’s as versatile as it is delicious. Whether you’re serving it for a special occasion or just as a hearty side, this recipe is sure to become a favorite in your kitchen.

Feel free to share your own tips and variations in the comments below or on our pages. Happy cooking!

While Mary Berry Cauliflower Cheese recipe is delightful as it stands, there are several variations and twists you can try to suit different tastes and dietary preferences. Here are a few ideas to inspire you:

  1. Spicy Cauliflower Cheese: Add a pinch of cayenne pepper or a splash of hot sauce to the cheese sauce for a spicy kick. You can also mix in some finely chopped jalapeños or chili flakes.
  2. Bacon and Cauliflower Cheese: For a meaty twist, stir in some crispy bacon bits into the cheese sauce before pouring it over the cauliflower. The smoky flavor pairs beautifully with the creamy cheese.
  3. Vegetable Medley: Incorporate other vegetables such as broccoli, carrots, or peas into the dish. Simply cook the vegetables along with the cauliflower and proceed with the recipe as usual.
  4. Herb-Infused Cheese Sauce: Add fresh herbs like thyme, rosemary, or chives to the cheese sauce for an aromatic boost. This adds a wonderful depth of flavor to the dish.
  5. Low-Fat Cauliflower Cheese: Substitute low-fat milk and cheese for a lighter version of this classic recipe. You can also use a reduced-fat butter or margarine in the sauce.
  6. Vegan Cauliflower Cheese: To make this dish vegan, use plant-based milk and cheese substitutes. Nutritional yeast can be added to mimic the cheesy flavor, and a vegan butter alternative can replace the regular butter.

Savory Corned Beef and Vegetable Pie Recipe

Introduction: Indulge your taste buds in a hearty and flavorful meal with this delightful Savory Corned Beef and Vegetable Pie. Packed with wholesome ingredients and a golden, flaky crust, this recipe is a perfect blend of comfort and culinary satisfaction. In this detailed guide, we’ll walk you through each step, offering tips and insights to ensure your pie turns out perfect every time.

 Pie Recipe
Pie Recipe


I. Ingredients: A Symphony of Flavors

  1. Vegetable Oil Elegance:
    • 1 tbsp vegetable oil sets the stage for a rich and savory base.
  2. Mirepoix Magic:
    • 1 large onion, chopped
    • 2 carrots, chopped
    • 1 potato, diced
  3. Corned Beef Brilliance:
    • 340g can of corned beef, cut into large, succulent pieces.
  4. Worcestershire Wizardry:
    • 1 tsp Worcestershire sauce for a depth of umami.
  5. Beefy Embrace:
    • 300ml warm beef stock adds a comforting touch.
  6. Flaky Elegance:
    • 320g ready-rolled shortcrust pastry sheet.
  7. Milk’s Golden Touch:
    • 1 tbsp milk for that perfect golden sheen.
  8. Sidekick Greens:
    • Buttered kale, to serve, adding a nutritious and flavorful companion.

II. The Artful Method: Crafting Culinary Masterpiece Vegetable Pie Recipe

STEP 1: Sautéing Symphony Vegetable Pie Recipe

  • Heat the oil in a large frying pan over a medium heat.
  • Sautee onions and carrots for 5 mins, adding a colorful and aromatic base.
  • Introduce diced potatoes, cooking for an additional 5 mins, enhancing texture and flavor.

STEP 2: Corned Beef Ballet

  • Gently stir in the corned beef, allowing it to dance with the veggies for 2-3 mins until it starts to gain a beautiful color.
  • Infuse the Worcestershire sauce, warm beef stock, and a pinch of seasoning, simmering for 5 mins until the potato achieves the desired tenderness.

STEP 3: Preparing the Stage

  • Preheat the oven to 200C/180C fan/gas 6.
  • Transfer the harmonious filling to a pie dish or small ovenproof dish, setting the stage for the upcoming pastry spectacle.
  • If needed, gently roll the pastry to size, ensuring it generously covers the top with a touch of excess.

STEP 4: The Grand Finale

  • Dampen the dish edges with water, inviting the pastry to join the performance.
  • Use a fork to press the pastry firmly onto the edge, creating a seamless connection.
  • Make a small slash in the middle, allowing the steam to gracefully escape, and trim any excess pastry with precision.

STEP 5: Baking Symphony

  • Place the pie on a baking tray, presenting it to the oven’s warm embrace.
  • Brush the pastry with milk, setting the stage for a golden brown crescendo.
  • Bake for 30-35 mins until the pie achieves a perfect harmony of colors and textures.

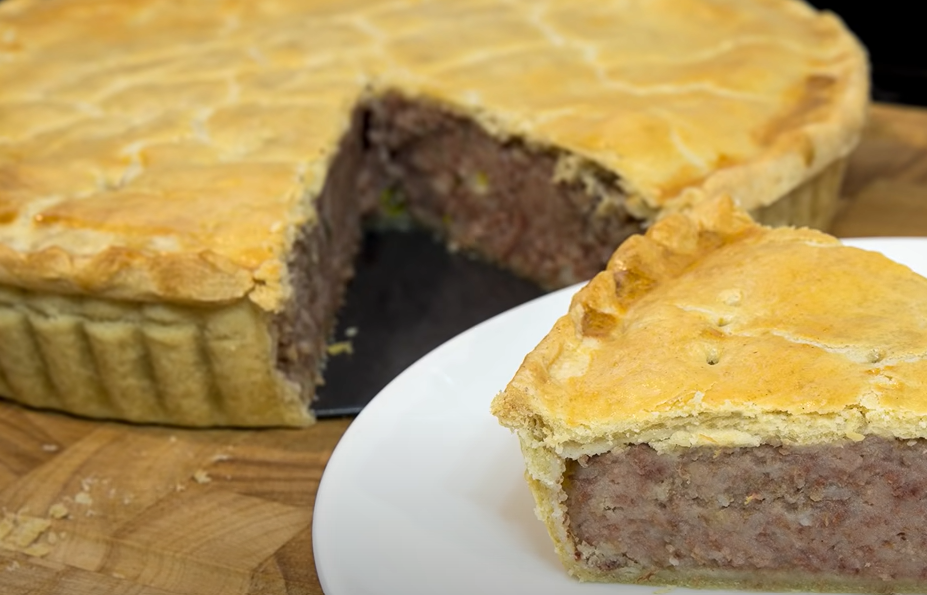
III. Presentation: A Feast for the Senses

The final act is as important as the preparation. Present your Savory Corned Beef and Vegetable Pie with artistic flair, perhaps accompanied by a sprinkle of fresh herbs or a drizzle of gravy. The golden crust should crunch with a symphony of textures, and the rich, savory aroma will tantalize your senses.


Conclusion: A Culinary Masterpiece on Your Plate

This Savory Corned Beef and Vegetable Pie recipe is not just a meal; it’s a culinary masterpiece. From the careful selection of ingredients to the meticulous crafting of each step, this dish is a celebration of flavors and textures. Whether you’re serving it for a family dinner or impressing guests, this recipe promises to deliver a satisfying experience that lingers on the palate and in the memory.