The Art of Crafting a Decadent Homemade Trifle: A Journey Through Layers of Delight
Introduction: The Evolution of Trifle-Making
As a teenager, my trifle-making journey began with boxed trifle kits—a simple mix of custard, cream topping, and a packet of chocolate sprinkles. Over time, I’ve discovered that crafting a proper homemade trifle involves a bit more effort, but each stage is a delightful and achievable experience. Let’s explore the intricate layers that make up the perfect trifle.
Section 1: Deconstructing the Trifle
1.1 Understanding the Components
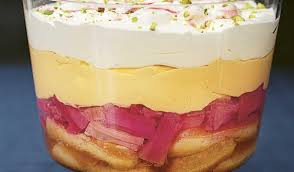
A trifle is a symphony of textures and flavors, consisting of syrup-soaked cake, juicily-ripe fruit, wobbly jelly, vanilla-scented custard, and dollops of whipped cream. Each component plays a crucial role in creating a harmonious dessert experience.
1.2 The Foundation: Sponge Fingers and Alternatives
The bottom layer of a trifle is typically made with sponge fingers or ladyfinger biscuits. These are often sandwiched together with jam and soaked in liqueur or fruit juice. Explore alternatives like Madeira cake, panettone, brioche, or slices of Swiss roll for unique variations in texture and taste.
Section 2: Fruitful Choices in Trifle-Making
2.1 The Fruit Medley
While summer fruits like strawberries and raspberries are traditional choices, the beauty of trifle lies in its versatility. Embrace creativity with fresh mango, blueberries, mandarin, pineapple, or passion fruit, either strewn over the sponge or used as a decorative topping for the final layer of cream.
2.2 Jelly or Not?
While not every trifle includes jelly, it adds a classic wobbly texture to the dessert. Learn the art of making your own jelly using gelatine leaves and fruit syrup or opt for ready-made jelly crystals. Pour it over the sponge base and witness the distinctive layers coming to life in a transparent trifle bowl.
Section 3: Custard – The Heart of the Trifle
3.1 The Perfect Custard
Powdered custard is ideal for trifles due to its thick texture that sets firmly. For a homemade touch, combine caster sugar, egg yolks, and cornflour, whisking them into a pan of vanilla-infused hot milk. Achieve a substantial consistency closer to crème patisserie, ensuring it forms a stable base for the layers above.
3.2 Custard Application and Cooling Techniques
After preparing the custard, spread it generously over the jelly and sponge finger layer. To prevent a skin from forming, cover the surface with cling film and chill it, allowing the custard to set and provide a luscious foundation for the trifle.
Section 4: Whipped Cream – The Fluffy Clouds on Top
4.1 Sweetening the Cream
The whipped cream is a crowning glory, sweetened with a touch of icing sugar. Whip it until it reaches the soft peak stage, creating a light and airy texture that complements the richness of the trifle.
4.2 Piling it High
Abundance is key when it comes to whipped cream. Pile it high on top of the set custard, allowing it to peek over the serving bowl’s edge, or consider piping it for a more sophisticated finish.
Section 5: Sprinkles and Toppings – Adding the Finishing Touch
5.1 Endless Possibilities
From shavings of milk chocolate and fresh raspberries to sour cherries, candied peel, crushed biscuits, and flaked almonds, the topping possibilities for your trifle are limitless. Explore different combinations to find your unique flavor profile.
5.2 The All-Time Favorite: Birthday Cake Sprinkles
In the realm of trifle toppings, multicolored birthday cake sprinkles hold a special place. Learn how to incorporate them into your trifle for a playful and visually appealing finish.
Conclusion: Crafting Your Masterpiece
In the art of trifle-making, every layer contributes to a decadent symphony of flavors and textures. From the foundation of sponge fingers to the airy whipped cream clouds on top, each step is a joyful endeavor. Embrace the creative freedom trifle-making offers, and soon, you’ll be crafting your own masterpiece—one layer at a time.